markmets415
Members-
Content count
1,957 -
Joined
-
Last visited
Everything posted by markmets415
-
Done today Dan, 3 of the 5 8'fers were cut down to 6' and two other steel hooks ordered, we removed the rake so there will be 6 different hooks on the Engine plus the 3' and 4' ones on the tool board, thanks for the conversations about it and the input, much appreciated
-
Thanks Dan, I'll see what I can do, the tubes are all 10' so we can put anything that or shorter in them, I'm thinking of losing the rake and adding a few more poles
-
Headed to the shop in the morning with some new tools and equipment to place, more photos to share tomorrow
-
Bruce that was my bad, there are 2 - 8'ers, 1 - 10'er and the dry wall hook plus a 36" on the tool board and a 4' multi purpose hook on the rear wall of the tool board compartment, I'll edit the previous post, thanks for the catch, I was typing it quickly this morning.
-
Here is the conceptual layout of the ladder and suction storage area, it will hold a 20' roof ladder, 26' three section extension ladder, a little giant ladder, 10' folding "attic" ladder, three 8' lengths of 2 1/2" suction, 1 10' pike pole, two 8' pike poles and a 8' dry wall hook (there also is a 36" small hook with D-handle on the tool board and on the rear wall of the tool board compartment there is a 4' multi purpose hook), a forestry rake and 3 12' lengths of 6" suction with Storz fittings. The hose bed grating and dividers go on top of this area. So in essence the ladders are stowed horizontally and slide out to the rear of the engine above the booster tank and under the hose bed, allowing a full rescue type body for holding equipment. Click on link bolded link below, once it opens, go to top of page and click on View, go to Rotate View, slide over to counterclockwise, to view the PDF drawing correctly HARD SUCTION COMPT3D-Model.pdf
-
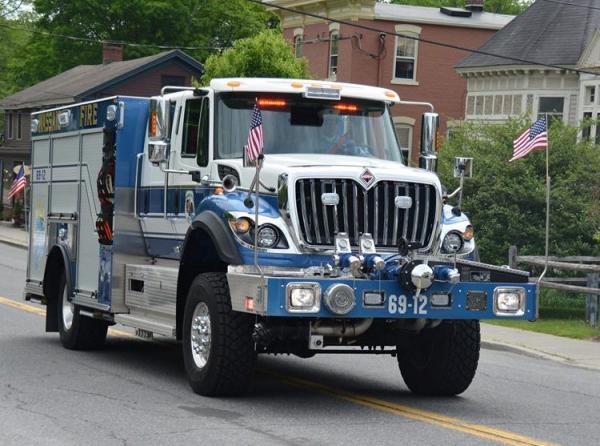
The amber lights on the mirrors come on with the parking lights, Brendan honestly it's been a long three years on this build and I cannot wait until it is delivered in a few weeks, thanks for the kind words and the posts, they're much appreciated.
-
A few sent from the shop today. Halogen bulb headlight upgrade from standard sealed beams, what a huge difference!!!, thanks SIGNMAN for the reminder at the last visit. Upper step at rear of Engine that we changed at the last visit to include areas for a gloved hand to be able to grab to use it to help pack hose as well as just a regular step, first photo shows step and second photo shows the grab area cutouts Another visit this Saturday, last one prior to the final inspection, the metal was cut and bent today to construct the ladder and suction storage areas so the rear opening will not look so big in a few days (you can see the metal for this area in the foreground of the first photo of the headlights).
-
A few from the visit today Rear compartment with the pro pack, chimney can, RAM and stacking tips with refrig and cones Tilt down shelf with both saws mounted with bar oil and fuel cans as well as the added shelf Front compartment, pac trac installed and some of the larger adaptors mounted. Pump panel cover Completed pump panel with dual tank to pumps for the two sumps in the poly tank, red switches are for the individual air controls for the CAFS lines Two front 2 1/2" discharges and gauges Front bumper compartment with various double females, double males and reducer, hydrant gate, 6" to 4 1/2" mutual aid adaptor for their dry hydrants and the Angus 3 2 1/2" to 5" Electric PPV fan, the upper wall will be peg board to hold the various cord and electrical adaptors, a shelf is to be added to hold the cord reels with 10/3 wire on them.
-
Some updated shots sent from the shop, added shelving, PAC Trac and slide out trays as well as pump panel completed
-
The grill lights will be shutoff when the parking brake is applied, they can be turned back on or overridden by the switch on the console if there's a need for them to be on. The bumper lights will remain for protection as they are below the operators sight line.
-
Yes Chris, the 89 Dash has been out of service for about 18 months now so we've been running with one Engine and automatic mutual aid from either Amenia, Millbrook or Dover depending on where in the district the call is, only on structure fire type assignments
-
You're welcome, we do get a lot of compliments on the blue/white scheme as well as grief from a few ball busters, my thing is, the color doesn't matter, it's still an Engine, myself I like the yellow or lime green. No visits this week to Firematic as I am headed out this afternoon to the New York State Fire Marshall's Conference in Syracuse for the week.
-
We do have a few red vehicles in our fleet, the Seagrave antique, the FWD (a few members own this now) and our recently purchased used Chiefs car from JHK The Seagrave The 1949 FWD we rescued a few years ago, the SIGNMAN and myself the day we brought her back home The Chief car
-
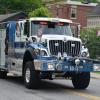
Why blue you ask, I'll keep it short and the next few posts are off topic but it will answer your question Back in 1988 while attending the NYS show at the old Concord Resort Hotel we came across an Engine that was built by Pierce for Peru, NY, an upstate FD that was painted Bright Regatta Blue or as we called it Pepsi Blue and our crew that was there that day really thought the Engine was very sharp, I took several pictures of it that day. After we returned and knowing that our 1974 tanker was out at Pierce for a refurbish we decided to share the photos with the members at the next monthly meeting and the membership voted to have our Tanker painted the same color, no other reason than that, the rest of the purchases after that have been the blue/white scheme. Here is the engine from Peru are our vehicles that followed (some of the photos are older and not the greatest) The Peru engine that got it started Our Tanker that was refurbished by Pierce in 1988 and first blue vehicle (Retired when new tanker purchased in 2007) 1989 Pierce Dash (retired) The Dash on scene 1997 Pierce (Went out of service this week as a trade in on the new Engine Rescue One light rescue 69-51 (photo courtesy of Ed Harvey) Smeal tanker 69-31 Firematic BRAT 69-62 PL Custom Ambulance 69-71 which will be retired in a few months as we have a new rig being built by Lifeline Pierce Mini Pumper which was originally red but was painted as shown when I was Chief (retired when we purchased the BRAT in 2009, photo courtesy of the SIGNMAN)
-
Below is a link to a short video of the front flashing LEDs, kind of looks like they have amber in the video but they are all red/white, it's not the best quality but you'll get the idea https://www.facebook.com/photo.php?v=10201711323014725&set=o.43159977621&type=2&theater A few more shots of the front, the pump panel was off as it was out to paint,
-
Took a few from our visit today and got the delivery date of September 21, 2013 Tilt down shelf showing the layout with chain saw, the vent saw with be on the shelf as well just mounted the opposite way of the chain saw. Adding more items to the front strainer compartment, the upper part of the compartment will have all three sides of pac trac for the various adaptors, the Engine has all yellow colored adaptors/strainers and suction ends, we started to color code our apparatus when we purchased the BRAT in 2009 Part of the console area with two cigarette 110 plugs and a USB port and also showing the GPS which also function as the monitor for the back-up camera and the 10 switch panel for the flashing type lights The charger unit for the Scott TIC The electronic valves for the CAFS speed lays mounted under the cab A clearer shot of the front of the tool board The CAFS appliance and the EZ fill foam unit The controls and hook-up for the foam EZ-fill unit Piping completed for the speed lays
-
Great topic Brian, I often heard the talk of the 'Good Old Days" when I was at the firehouse as a pup with my dad, watching, listening and seeing how the guys went about carrying out serving their community and always having each others backs no matter the situation. I joined my department in 1982, although I was there long before that with my dad and really enjoyed "hanging out" at the station and listening to the stories of the Big ones that occured in town and neighboring towns, the jokes played on one another, how so and so got into trouble with the Chief, the key was I was listening, not opening my mouth as a 18 year old kid that just joined even though my dad was one of the Chiefs. I was taught by watching and learning to how to respect the fire service by a band of brothers that seemed to do everything together, the firehouse was the hub of the community and a gathering place. Well sadly it surely is not that way, one night not long ago, a few of us that have been around for awhile were now the ones telling stories that we had gained during our service time and I made a comment about the "good old days" and much to my dismay the President at the time made a remark that appalled me to no end, this is what came out of the mouth, "Forget those days, they are long gone", summed it up for me right there. Am I as active as I once was, NO!, Do I have the drive I once had, NO!, can I do what I could do when I was 18 or 19, NO! I've put in 32 years into the emergency services both as a volunteer and as a career and still have it in my blood and desire to make my department the best department it can be but my words often go unheard, often ignored to the younger members that couldn't tell you who the first fire Chief was, hell they couldn't tell you who the Chief was in 2000, or even know that someone like my dad who still visits the fire station every day was even a Fire Chief, or that he is nearing 60 years as a member, unless they read it on one of the plaques at the station. I will say this, if we forget how we got here then we might as well close the doors, forgetting the past or not even wanting to know it is a travesty
-
Thanks Brendan, it will be a well laid out Engine with a specific place for all the equipment it will carry, there has been alot of time spent trying to make this the best possible Engine we could make it, for to many years we've had equipment stored on top of each other, which is not only not safe but caused damage to items and not to mention a pain in the butt to have to move items to get to other items. It should serve our district and our neighboring departments well.
-
I just got a few from the shop, still a bit blurry as they are cell phone pictures but it shows the custom pullout shelve/tray with custom made storage areas for the premix fuel cans and gallon container of bar oil, the tray will hold our chain saw and vent saw. The tilt out shelve/tray The three areas for the pre-mix fuel and the box for the bar oil. Again we will be headed down Friday so I will supply updated photos with my camera.
-
We are headed down now Friday morning so I will have more updated clear photos to share on the progress.
-
They sent a few yesterday, alittle blurry but you get the idea, I was supposed to go today but wasn't much feeling like driving down solo, the tool board mounts, front and back, getting closer to the end!
-
Blank panel built to cover the auto fill and an area made for the hydraulic pump which will be on a slide out tray, the cutter/spreader will be mounted. Pump panel mocked up for approval, the panel will now be taken apart and be painted and re-assembled. Pump panel Shot of the driver's side Another shot of the rear compartment and generator with the Circle D 4-way electrical box Auto fill control which were placed in the rear compartment on the panel placed over the unit, the trim work was left off at this point as this too is mocked up, the panel that the controls are on will be taken out and painted with the gray splatter interior compartment paint. Rear driver's side compartment, shelve made to fit around cones, and area will be built over the cones that extend above the shelf to hold our chimney fire kit, shelve also is holding the new RAM mini 500 GPM gun, and the refrigerator also shown. front driver's side compartment, which is to hold a 25' 5" donut roll, 2 50' 3" donut rolls, the 6" storz floating dock strainer, 6" storz low flow strainer, 6" storz barrell strainer, they have to finish the area that will house the 2 1/2" barrell and box strainers. Another shot of the pump panel controls A shot of the passenger's side showing the rear two compartments with the extrication tools and the tool board.
-
Captain that is the rear autofill piping that goes into the booster tank from the rear of the Engine.
-
Yes for sure Seth, they work right along once they get on the unit, this is one of the reasons why I have been down 4 weeks in a row, just to see how things are going and working with the crew there, as you saw they are an amazing crew and it's had to beleive the quality of work they do from such a small shop, very very talented crew, that welcomes us on every single visit, it's pretty awesome to be on a first name basis with them all, we've built a pretty strong working relationship that you got to see first hand with us. We covered tons of stuff on Friday, it was pretty nice being able to setup the pump panel as "we wanted it" not just put together, this is what custom work is all about. I am supposed to go down again this week on Thursday but I am not sure yet, I'll be headed to Vermont for some R & R Friday for several days so I'd like to go down before I leave on the trip.
-
There were a few shots taken with my camera yesterday, so here they are, the front compartment that is nearly complete to hold the various strainers and donut rolls of hose, the generator with cord reel with the circle D electrical box and 24" pullout steps added, the auto fill being installed, you can also see the inlet for the auto fill under the step on the passenger's side of the photo showing the generator compartment , a blank panel with be going over this piping and valve as well, the back of the swing out tool board which will have three SCBA, TNT tool and a small hook, 10 switch box which will run all the clear lighting such as the front brow light, the PIAA driving lights, the side and rear scene lights, perimeter lighting and steps and tailboard lighting. The engine looks taller than it is, measured yesterday at 9'6" at the rear, 9'9" at the cab and length is 31'4".